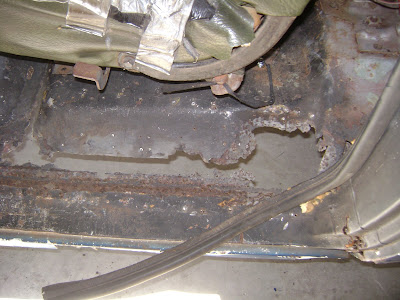
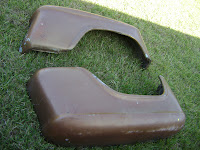
It occurs to me that maybe not everyone is so concerned with the minute details of this project. To you, I say "sorry." Today I removed the drivers side step from the bed. Now THAT was fun- lying underneath the truck with an angle grinder going after what at one time had been 7/16" nuts, shooting sparks into my face and slowly roasting next to the worklight. I can only take comfort in knowing that the more body panels I remove, the less material will be overhead to rain rust particles on me every time I crawl underneath.
The following information regarding attachment hardware is mainly for my own information, so I can reassemble it sometime in the future properly. The top flange is bolted to a matching flange on the bottom side of the bedside panel with 7/16" nuts and bolts. Two of these were the ones that had to be ground off. The front of the flat step surface was attached by carriage bolts. One was missing. These go down through a metal support that appears to mount up under the bed to one of the bed cross frame pieces. The four remaining holes were 1/2" nuts and bolts attached to the fender removed earlier this week. Once I got the step on the bench, it was easier to remove the two that remained- one by grinding and one by drilling.
Once the piece was removed, the rusted hardware taken off and the Bondo removed, the step itself actually appeared to be in decent shape. There should be minimal work to refurbish this piece to be able to re-use it.
Those of you that know me well, or knew me a long time a ago, are aware that I drove a '66 Chevy C-10 Pickup in high school. You will also know that there was an accident, and ever since then I've been wanting to fix it again. Well, now I'm starting, only to realize that it was in worse shape than I remembered, or in worse shape than I could let my youthful optimistic ignorance see.
Thursday, July 2, 2009
Wednesday, July 1, 2009
July 1st, 2009
Yesterday I went down to Harbor Freight and bought some bodyworking tools. Hammers, dollies, pliers... well, mostly hammers. On the trip back I stopped into every auto parts store I passed (Carquest, a paint shop, Napa, skipped Advance because I had already looked there, and AutoZone). No one had a flexible cheese grater for shaping Bondo. Everyone has the rigid ones, but I can't come across a flexible one anywhere!
Today, instead of cleaning the house or anything else constructive, I decided to try the chemical paint stripper. Now normally I would set up in the front yard underneath the oak tree, but since I am dealing with the great outdoors, wind currents can never be predicted, so I decided to move a safe distance away from my other cars. Sure, I could have moved the cars a safe distance away, but it was easier just to move the fender.
I set up against the neighbors fence. Now, before you go worrying that I might damage the fence, I assure you that I've taken every caution to be careful not to overspray. At least I did after I got the can pointed in the right direction. The fence itself is rotten enough on its own, and there's moss growing all over it, not to mention that the house has been foreclosed and has been vacant for some time. There was also plenty of room to step away and avoid the fumes. This was especially important because I don't have a respirator and was simply holding my breath during the application.
The immediate results were surprising. The paint started to peel and curl up within just a minute! The instructions had indicated that this would take longer, and a full hour was necessary for the maximum effect. After just three or four minutes, the effect was quite noticeable, as the paint had started bubbling in the entire treated area. At this point, it started looking like it might rain again, so I grabbed the fender by its non-toxic end (as I had only treated the forward third) and put it on my back porch.
I went back to look at it after 20 minutes, and was disappointed to see that it hadn't changed much. After the initial dramatic results I was expecting something a bit more exciting.
Much later in the day I went back and was disappointed to find that it looked about the same as it did after only 20 minutes. After scraping it down with a putty knife and a wire brush, I ended up with this:
I was expecting to get much more paint off than this! I may try one more application, but if that doesn't work, I'll have to go back to more tried and true mechanical means of paint removal.
Tuesday, June 30, 2009
June 29th, 2009
Fiberglass Practice
Today I worked on a piece that has absolutely nothing to do with my truck. I went to a neighbors garage sale last weekend, and my friend Erik who lives next door to him put a banged up Porsche fender in the back of my truck, just to get rid of it. It's from a rather nice '83 Porsche 944, which he is now trying to sell. I was originally going to sneak into his back porch while he was at work and leave the thing in his grill or something, but I decided instead to use it for some bodywork practice, since nobody really cares about it. Besides, I think he locks the screen door, anyway.
Right, so here's the piece in question. Now, you may wonder why I would try to work on this piece. It's thinner than anything on the truck, and instead of rust holes, its problem is serious deformation. If you asked the question, go take a hike. Any practice is good practice, right? I figured that Bondo work can't really be all THAT difficult. I mean, I've met some of the people that do it. I will now share some of the learning experiences I had during this attempt.
For those of you not familiar with Bondo, it is this two part fiberglass goop that you mix together into a paste, and then apply onto metal (or wood or plastic), and then when it hardens, you can sand it into shape rather easily. It hardens quickly enough that you can shape it, sand it, and paint it all within a few hours.
I removed the paint with my new grinding pad. If you've never used one of these, they look kind of like a coarse sponge but are stiff. I haven't decided whether I like it yet, but as you can see, the wire wheel was quickly reaching retirement age. I started banging it out to what I thought was the original shape.
Lesson 1. Check your work often against a known pattern. If you can attempt to fit your piece to the car, do it often. Unfortunately, this was a luxury I did not have, since it was not actually a piece of a car I own. I went over to Erik's house to look at the new fender he had installed, so I was able to get a feel for what the original body line was supposed to look like. I must have gotten it close, but I'm sure it's not going to be a perfect fit. Fortunately, as already mentioned, no one really cares about the fate of this fender.
I then mixed up a heaping dollop of Bondo out of an old quart-sized can I had in the garage and began to apply it.
Lesson 2. Don't mix up too much Bondo. It only has a working time of a few minutes, much shorter than what I was expecting. Maybe it actually was the three or four minutes as shown in the directions on the can, but it certainly felt much shorter than that.
This was directly related to lessons 3 and 4.
Lesson 3. Don't put it on after it has started to harden. It stops going on like toothpaste and instead starts to look like you're attempting to spread stale bread. This, of course, was not much fun to shape, and wound up getting almost entirely ground back off.
Lesson 4. Don't put too much on. It's better to do it in multiple thin layers. I wound up grinding a vast majority of the first layer off. Interestingly, the chemical reaction between the two parts made it warm up noticeably.
All right, this was turning out to be more difficult than I thought.
Lesson 5. Clean up your mixing surface as soon as the Bondo starts to harden. If you catch it early, it's really quite easy to scrape off. Now, if you're using something flexible, it's easy to remove after it hardens. If you're using something disposable, no worries, just throw it away. But if you're using a scrap of plywood that you were planning to reuse, you really should scrape it off with a putty knife as soon as you can. Oh, and speaking of putty knives . . .
Lesson 6. Use the right applicator. You can pick up a nice set of applicators at any auto parts store for three to five dollars. They're really useful, you can kind of shape the material as you're applying it, and being flexible, they're also easy to clean up. I recommend these. I used a putty knife.
(Side note- I bought some today, and amazingly enough, they're the same pink color as the Bondo should be when it's mixed properly!)
Lesson 7. Rough shaping can start right away. As soon as it hardens, I found that I could scrape the ridges left by my putty knife could be scraped off rather easily with the same putty knife, saving tedious shaping later. Just be careful not to go overboard with it.
Lesson 8. Use the right tools for shaping. They make these cheese grater looking things which are excellent for shaping while the material is still soft. Not having one of those, I used a coarse metal file. It worked all right, but would have been better if it was wider. It is better to use these tools more and sandpaper less, as sandpaper tends to clog up rather quickly. I was using 120 and 220 grit paper, and I did purchase a flexible sanding block, which I also recommend. Feather the edges with a 400 grit sandpaper, per the directions on the can. If you do mess up per lesson 4, that grinding disk is effective at removing large amounts of material quickly, but keep in mind- no matter what attachment you put on an angle grinder, it was never designed to be a precision instrument.
Lesson 9. Wear your dust mask when sanding (or grinding). I forgot ONCE and I've been coughing ever since. Take the time to put one of these on.
Lesson 10. You CAN mix up too little. I was just filling in a few little nicks and pits, so I decided to be conservative, based on lesson 4. By the time I had it mixed, it had spread it mostly around my mixing board, and almost didn't have enough to reload onto my putty knife. a non-absorbent surface like a plastic or metal mixing board may alleviate this somewhat.
Lesson 11. Bondo has a shelf life. By now, I had mixed up four batches of fiberglass and was getting near the bottom of the can. Now, I bought this can for work a little over three years ago. On the top it looked normal, but when I got down to the bottom few inches of the can, it looked kind of like greasy cottage cheese.
I was now running low on Bondo, sandpaper, time, and patience. I really did learn a lot, but the fender isn't anywhere near being finished. But who cares? I got in some practice, learned some pitfalls, and hopefully have been able to pass something useful onto my readers. I may try to finish it another time, but for now, my curiosity on this subject has been satisfied. And it's not like anyone needs the fender. However, if any of you want to buy it...
June 27th, 2009
Fiberglass Practice
Today I worked on a piece that has absolutely nothing to do with my truck. I went to a neighbors garage sale last weekend, and my friend Erik who lives next door to him put a banged up Porsche fender in the back of my truck, just to get rid of it. It's from a rather nice '83 Porsche 944, which he is now trying to sell. I was originally going to sneak into his back porch while he was at work and leave the thing in his grill or something, but I decided instead to use it for some bodywork practice, since nobody really cares about it. Besides, I think he locks the screen door, anyway.
Right, so here's the piece in question. Now, you may wonder why I would try to work on this piece. It's thinner than anything on the truck, and instead of rust holes, its problem is serious deformation. If you asked the question, go take a hike. Any practice is good practice, right? I figured that Bondo work can't really be all THAT difficult. I mean, I've met some of the people that do it. I will now share some of the learning experiences I had during this attempt.
For those of you not familiar with Bondo, it is this two part fiberglass goop that you mix together into a paste, and then apply onto metal (or wood or plastic), and then when it hardens, you can sand it into shape rather easily. It hardens quickly enough that you can shape it, sand it, and paint it all within a few hours.
I removed the paint with my new grinding pad. If you've never used one of these, they look kind of like a coarse sponge but are stiff. I haven't decided whether I like it yet, but as you can see, the wire wheel was quickly reaching retirement age. I started banging it out to what I thought was the original shape.
Lesson 1. Check your work often against a known pattern. If you can attempt to fit your piece to the car, do it often. Unfortunately, this was a luxury I did not have, since it was not actually a piece of a car I own. I went over to Erik's house to look at the new fender he had installed, so I was able to get a feel for what the original body line was supposed to look like. I must have gotten it close, but I'm sure it's not going to be a perfect fit. Fortunately, as already mentioned, no one really cares about the fate of this fender.
I then mixed up a heaping dollop of Bondo out of an old quart-sized can I had in the garage and began to apply it.
Lesson 2. Don't mix up too much Bondo. It only has a working time of a few minutes, much shorter than what I was expecting. Maybe it actually was the three or four minutes as shown in the directions on the can, but it certainly felt much shorter than that.
This was directly related to lessons 3 and 4.
Lesson 3. Don't put it on after it has started to harden. It stops going on like toothpaste and instead starts to look like you're attempting to spread stale bread. This, of course, was not much fun to shape, and wound up getting almost entirely ground back off.
Lesson 4. Don't put too much on. It's better to do it in multiple thin layers. I wound up grinding a vast majority of the first layer off. Interestingly, the chemical reaction between the two parts made it warm up noticeably.
All right, this was turning out to be more difficult than I thought.
Lesson 5. Clean up your mixing surface as soon as the Bondo starts to harden. If you catch it early, it's really quite easy to scrape off. Now, if you're using something flexible, it's easy to remove after it hardens. If you're using something disposable, no worries, just throw it away. But if you're using a scrap of plywood that you were planning to reuse, you really should scrape it off with a putty knife as soon as you can. Oh, and speaking of putty knives . . .
Lesson 6. Use the right applicator. You can pick up a nice set of applicators at any auto parts store for three to five dollars. They're really useful, you can kind of shape the material as you're applying it, and being flexible, they're also easy to clean up. I recommend these. I used a putty knife.
(Side note- I bought some today, and amazingly enough, they're the same pink color as the Bondo should be when it's mixed properly!)
Lesson 7. Rough shaping can start right away. As soon as it hardens, I found that I could scrape the ridges left by my putty knife could be scraped off rather easily with the same putty knife, saving tedious shaping later. Just be careful not to go overboard with it.
Lesson 8. Use the right tools for shaping. They make these cheese grater looking things which are excellent for shaping while the material is still soft. Not having one of those, I used a coarse metal file. It worked all right, but would have been better if it was wider. It is better to use these tools more and sandpaper less, as sandpaper tends to clog up rather quickly. I was using 120 and 220 grit paper, and I did purchase a flexible sanding block, which I also recommend. Feather the edges with a 400 grit sandpaper, per the directions on the can. If you do mess up per lesson 4, that grinding disk is effective at removing large amounts of material quickly, but keep in mind- no matter what attachment you put on an angle grinder, it was never designed to be a precision instrument.
Lesson 9. Wear your dust mask when sanding (or grinding). I forgot ONCE and I've been coughing ever since. Take the time to put one of these on.
Lesson 10. You CAN mix up too little. I was just filling in a few little nicks and pits, so I decided to be conservative, based on lesson 4. By the time I had it mixed, it had spread it mostly around my mixing board, and almost didn't have enough to reload onto my putty knife. a non-absorbent surface like a plastic or metal mixing board may alleviate this somewhat.
Lesson 11. Bondo has a shelf life. By now, I had mixed up four batches of fiberglass and was getting near the bottom of the can. Now, I bought this can for work a little over three years ago. On the top it looked normal, but when I got down to the bottom few inches of the can, it looked kind of like greasy cottage cheese.
I was now running low on Bondo, sandpaper, time, and patience. I really did learn a lot, but the fender isn't anywhere near being finished. But who cares? I got in some practice, learned some pitfalls, and hopefully have been able to pass something useful onto my readers. I may try to finish it another time, but for now, my curiosity on this subject has been satisfied. And it's not like anyone needs the fender. However, if any of you want to buy it...
Right, so here's the piece in question. Now, you may wonder why I would try to work on this piece. It's thinner than anything on the truck, and instead of rust holes, its problem is serious deformation. If you asked the question, go take a hike. Any practice is good practice, right? I figured that Bondo work can't really be all THAT difficult. I mean, I've met some of the people that do it. I will now share some of the learning experiences I had during this attempt.
For those of you not familiar with Bondo, it is this two part fiberglass goop that you mix together into a paste, and then apply onto metal (or wood or plastic), and then when it hardens, you can sand it into shape rather easily. It hardens quickly enough that you can shape it, sand it, and paint it all within a few hours.
I removed the paint with my new grinding pad. If you've never used one of these, they look kind of like a coarse sponge but are stiff. I haven't decided whether I like it yet, but as you can see, the wire wheel was quickly reaching retirement age. I started banging it out to what I thought was the original shape.
Lesson 1. Check your work often against a known pattern. If you can attempt to fit your piece to the car, do it often. Unfortunately, this was a luxury I did not have, since it was not actually a piece of a car I own. I went over to Erik's house to look at the new fender he had installed, so I was able to get a feel for what the original body line was supposed to look like. I must have gotten it close, but I'm sure it's not going to be a perfect fit. Fortunately, as already mentioned, no one really cares about the fate of this fender.
I then mixed up a heaping dollop of Bondo out of an old quart-sized can I had in the garage and began to apply it.
Lesson 2. Don't mix up too much Bondo. It only has a working time of a few minutes, much shorter than what I was expecting. Maybe it actually was the three or four minutes as shown in the directions on the can, but it certainly felt much shorter than that.
This was directly related to lessons 3 and 4.
Lesson 3. Don't put it on after it has started to harden. It stops going on like toothpaste and instead starts to look like you're attempting to spread stale bread. This, of course, was not much fun to shape, and wound up getting almost entirely ground back off.
Lesson 4. Don't put too much on. It's better to do it in multiple thin layers. I wound up grinding a vast majority of the first layer off. Interestingly, the chemical reaction between the two parts made it warm up noticeably.
All right, this was turning out to be more difficult than I thought.
Lesson 5. Clean up your mixing surface as soon as the Bondo starts to harden. If you catch it early, it's really quite easy to scrape off. Now, if you're using something flexible, it's easy to remove after it hardens. If you're using something disposable, no worries, just throw it away. But if you're using a scrap of plywood that you were planning to reuse, you really should scrape it off with a putty knife as soon as you can. Oh, and speaking of putty knives . . .
Lesson 6. Use the right applicator. You can pick up a nice set of applicators at any auto parts store for three to five dollars. They're really useful, you can kind of shape the material as you're applying it, and being flexible, they're also easy to clean up. I recommend these. I used a putty knife.
(Side note- I bought some today, and amazingly enough, they're the same pink color as the Bondo should be when it's mixed properly!)
Lesson 7. Rough shaping can start right away. As soon as it hardens, I found that I could scrape the ridges left by my putty knife could be scraped off rather easily with the same putty knife, saving tedious shaping later. Just be careful not to go overboard with it.
Lesson 8. Use the right tools for shaping. They make these cheese grater looking things which are excellent for shaping while the material is still soft. Not having one of those, I used a coarse metal file. It worked all right, but would have been better if it was wider. It is better to use these tools more and sandpaper less, as sandpaper tends to clog up rather quickly. I was using 120 and 220 grit paper, and I did purchase a flexible sanding block, which I also recommend. Feather the edges with a 400 grit sandpaper, per the directions on the can. If you do mess up per lesson 4, that grinding disk is effective at removing large amounts of material quickly, but keep in mind- no matter what attachment you put on an angle grinder, it was never designed to be a precision instrument.
Lesson 9. Wear your dust mask when sanding (or grinding). I forgot ONCE and I've been coughing ever since. Take the time to put one of these on.
Lesson 10. You CAN mix up too little. I was just filling in a few little nicks and pits, so I decided to be conservative, based on lesson 4. By the time I had it mixed, it had spread it mostly around my mixing board, and almost didn't have enough to reload onto my putty knife. a non-absorbent surface like a plastic or metal mixing board may alleviate this somewhat.
Lesson 11. Bondo has a shelf life. By now, I had mixed up four batches of fiberglass and was getting near the bottom of the can. Now, I bought this can for work a little over three years ago. On the top it looked normal, but when I got down to the bottom few inches of the can, it looked kind of like greasy cottage cheese.
I was now running low on Bondo, sandpaper, time, and patience. I really did learn a lot, but the fender isn't anywhere near being finished. But who cares? I got in some practice, learned some pitfalls, and hopefully have been able to pass something useful onto my readers. I may try to finish it another time, but for now, my curiosity on this subject has been satisfied. And it's not like anyone needs the fender. However, if any of you want to buy it...
Sunday, June 28, 2009
June 26th, 2009
My time in South Florida has ended! I am now back in the Sanford area full time! I now have plenty of time, in between looking for a job, to play my favorite truck-related game- Just How Bad Is It, Anyway?
Okay, so it was Friday afternoon, my girlfriend was going to be tied up several hours in the evening, and I'd had enough housecleaning to last me a while. So I decided to go after my truck with my wire brush.
I started on the passenger side door. Yes, that disgusting orange thing off the parts truck that was partially spraypainted a distant blue with wirewheel marks on the window. The surface featured, among the traditional surface rust, this amazing textured paint job. It appears that someone in that trucks past had applied a paint incompatible to what was already there, or simply decided that sanding was unnecessary before painting. If the surface already looked like that, then I guess I can see where anything would have been an improvement, sanding or no.
I started just behind the window and brushed down a small spot, then moved below the window to some particularly grievous looking surface rust. And so, "Just How Bad Was It?" Surprisingly, not bad. I was actually able to expose bare metal easily enough, and the offending mostly orange paint gave way to smooth steel underneath. Even the surface rust had only minimally pitted the surface.
Encouraged by these results, I covered up the bare metal I had uncovered with sanding primer to protect it from rusting, and moved on to the rear corner of the hood on the passenger side. There were some rust holes visible and the surface was bubbling, a classic indication of a poorly done repair job. After some liberal application of the wire wheel, I uncovered the ugly truth. So, "How bad was it, Anyway?" The original rust hole had formed where two pieces of metal joined and were spot welded. This created a water trap, and both pieces rusted through. Our would-be restorer (recall that this hood came from a different parts truck) filled up the holes with fiberglass and smoothed it over. After some time, no less than ten years, rust started bubbling up the paint and glass and it became obvious that a better repair job was in order. I also covered this up with sanding primer and left it for later, when I really start in on the hood and weld in some new metal.
Quit while I'm ahead? Never! I moved onto another spot, this one on top of the hood on the drivers side. Now this one looked easy. It looks like a dent had been repaired at one time, but the fiberglass had bubbled and popped away from the center, leaving a hole about 6" long and 3" wide, revealing the metal underneath, which featured some surface rust. No problem, right? Simply remove the fiberglass back to metal, remove the rust, and bang out the dent. "Just How Bad Was It?" Well, getting back to the norm, the answer with this spot was the usual "worse than I thought." I chipped back some of the Bondo with a screwdriver and started attacking the rest with the wire wheel. As it turned out, it was more than a simple dent- it was a scratch that ran almost the whole length of the hood. The cracked out part was just the deepest part. I took out the Bondo forward of there I started and some backward. I removed as much surface rust as I could with the wire wheel (which was starting to look pretty sad at this point) and treated the area with this rust converter stuff. Available at many auto parts stores, this his chemical converts iron oxide to "iron chromo-phosphate" and leaves a sealed surface. I'll get back with you on how it works. I covered this too with primer to ward off rust and that was a day.
Sunday, April 26, 2009
April 26th, 2009
Looks like I haven't mentioned in any of my posts that earlier this year, I took a weekend and pulled out the old sheet aluminum that some of us had installed on the floor ten years or so ago, when the truck was in operation. It was the remains of an old sign, cut up, banged into rough shape, and affixed over the worst areas of the floor with screws and pop-rivets. Hundreds of pop-rivets. At any rate, I took it all out, mostly with an angle grinder, to assess the damage. Have a look.
Left- This was taken looking in the passenger side window. Yes, that's daylight. Looks like the bottom of the door post is gone, as well as the top of the rocker panel. Well, I guess because it is.
Before I installed the aluminum, people were actually afraid to ride in my truck, for some reason. The plan is to get a MIG welder (since the fine Craftsman stick welder my roommate scavenged from his dad's garage tends to blow holes in thinner metals) and buy some replacement floorboards from my LMC Truck catalog. This is an excellent source of parts (I have used them before). Plus, the exploded diagrams have offered a few clues as to how the truck was put together, though it's no substitute for a real factory or shop manual. I intend to get one, they tend to run around $30 online.
Left- This was taken looking in the passenger side window. Yes, that's daylight. Looks like the bottom of the door post is gone, as well as the top of the rocker panel. Well, I guess because it is.
Below- This is between the drivers side seat and the door. The seat mounts are further inboard, resting on more solid metal.
....Mostly.
Before I installed the aluminum, people were actually afraid to ride in my truck, for some reason. The plan is to get a MIG welder (since the fine Craftsman stick welder my roommate scavenged from his dad's garage tends to blow holes in thinner metals) and buy some replacement floorboards from my LMC Truck catalog. This is an excellent source of parts (I have used them before). Plus, the exploded diagrams have offered a few clues as to how the truck was put together, though it's no substitute for a real factory or shop manual. I intend to get one, they tend to run around $30 online.
Saturday, April 25, 2009
March 1, 2009
March 1, 2009
Well, as birthdays go, this was a memorable one. I drove over to my parents house in Citrus County with my girlfriend to spend the weekend there. I was excited that she had agreed to come with us to the Webster Auto Swap, which was being held that Sunday. My roommate, who rarely gets to come to one of these events, drove over and met us Sunday morning, and after breakfast we piled into his big red Silverado and headed toward Webster. The forcast was that there was to be a cold front passing through the area that morning, and wouldn't you know it, the forecasters were right. We got there in the middle of it. The rain wasn't really that bad- we had been provided warm clothes and umbrellas by my parents- it was the stiff and gusty wind that drove the rain into our allegedly waterproof jackets that made the cold. They still charged us admission. The show itself was in the pasture north of its usual location, due to the concurrent Sumter County Fair. It was also half the size of the Winter Extravaganza two weeks prior, or at least it would have been had the weather not been driving off all but the most hard-core of vendors. The three of us walked around the show, looking at the stuff that vendors had not packed away or thrown tarps over, usually not lingering too long at any one spot. We did stop at a hot dog stand under a canopy for a few minutes, though. I knocked on a few windows and walked into a few trailers to ask some questions, but I didn't find any truck or Camaro parts. I figured, though, that if these guys were committed enough to be out there in that infernal cold, I would at least look at what they had to offer. Toward the end of our time there, it had pretty much stopped raining, but the wind was still howling at a good clip. By that point, however my girlfriend decided that she's rather wait in the Silverado out of the weather. And, as she has little interest in old car parts, I don't blame her.
Saturday, February 14, 2009
February 14, 2009
Why do so many things have to happen on the same weekend? My roommate had plans, I had plans, it just happened to be valentines day, but most importantly (for the subject matter in this blog) it was the same weekend as the Webster Auto Swap Winter Extravaganza! I found this guy, Darren, from Texas on craigslist who specializes in 60-66 Chevy trucks and Suburbans. He makes trips to Florida and different areas of the southeast for events like the auto swap. I can provide contact information if anyone wants it, just leave a comment requesting it.
Friday I left from south of Miami, stopped in Orlando for dinner with the girlfriend, and on to Citrus County to my parents house, a convenient 30 miles from Webster (if you know the back way). My dad and I headed for the swap meet the next morning after an early breakfast. Now, the auto swap is held monthly, but this being their special event, it was twice the size it normally is. For those of you unfamiliar with this show, its like a big flea market with an auto theme and a car show. Hundreds of people from all over the southeast (and Texas, like Darren) set up tables or benches in this big field, or many sell stuff right off their trailers. Car parts, model cars, whole cars, mostly classics set up in an almost orderly fashion as far as the eye can see. They have a smattering of vendors that sell things that aren't even car related, which I have always found to be frustrating. I'm there to look for parts and accessories, not rugs or toys or wood carvings.
My dad and I walked around for probably over an hour, with my dad having to stop to rest a few times. By the time I found Darren, we had walked almost the whole place, and dad was out of steam. So he left. I bought the bedside panels and fenders that he brought with him. In the process of walking back across the fairgrounds to the ATM, I wound up finding other parts for sale. The long and short of it is that I left there with two sets of rear fenders, two sides of the box that makes up the bed, a tailgate, a rear bumper, and a seat. Sure, I spent more than I planned on, but I can use the best parts and sell the ones I don't use and get my money back. Plus, I can sell the fenders that are currently on the truck (a different shape, since they're off a '68) and get a little back for them, too.
All in all, it was a good trip. I drove back to my house with the back of my Taco piled high with parts, unloaded the truck, and still had time for a shower and a lovely evening with my girlfriend. Best Valentines Day ever.
Post Written on 4/15/09
Subscribe to:
Posts (Atom)